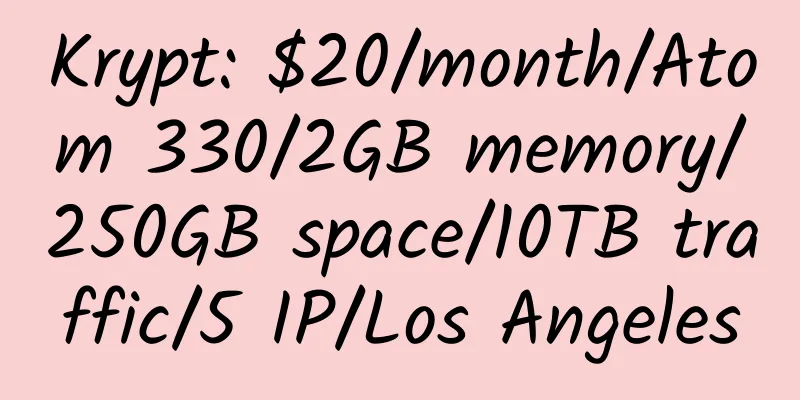
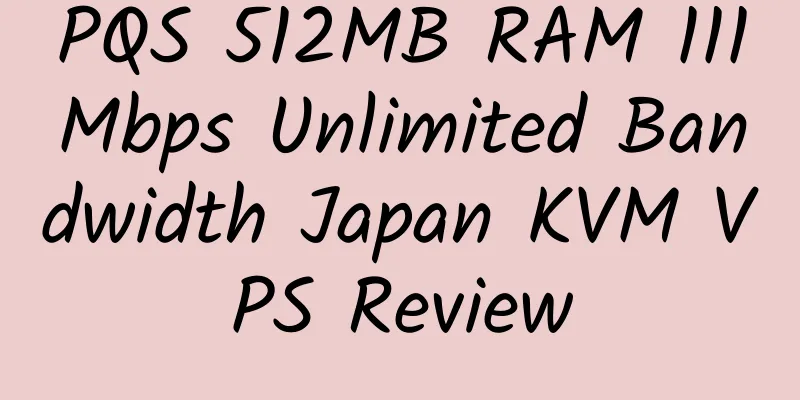
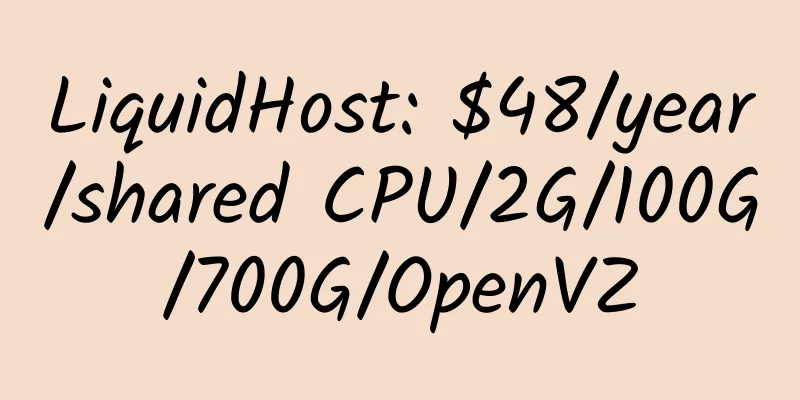
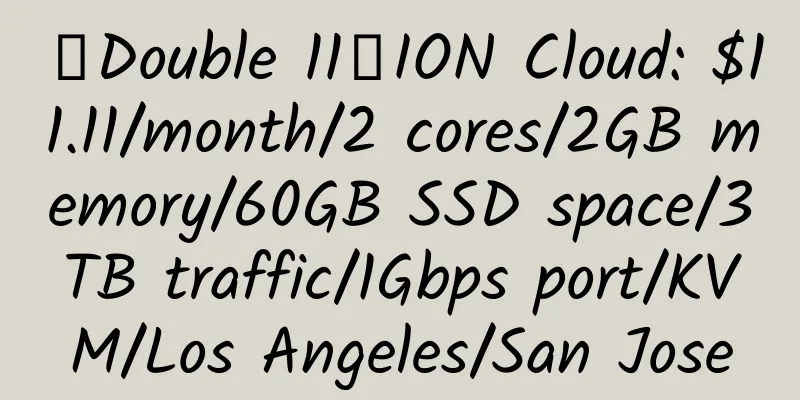
|
Today, I will use an article to introduce the DreamHost purchase tutorial in a graphic way for friends who are not good at English to refer to.
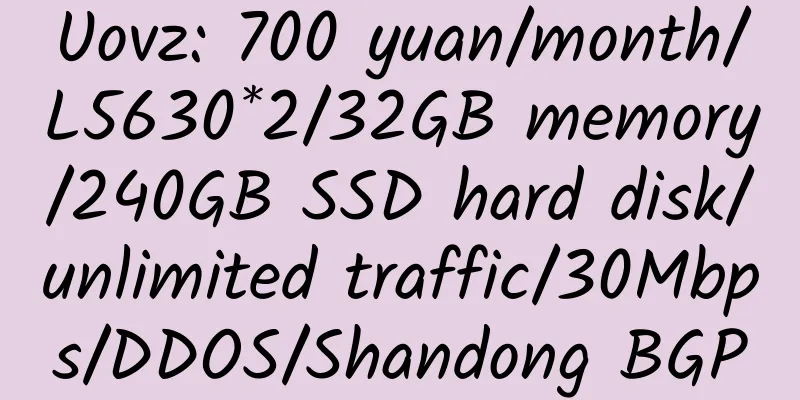
DreamHost provides network space with unlimited capacity and unlimited traffic, supports various mainstream PHP site programs at home and abroad, and can establish multiple sites at the same time without affecting each other. DreamHost also provides free SSH function to establish a secure transmission channel for your data.
The reason why this article is called the Safe Purchasing Guide is to emphasize that many friends currently get DreamHost discounts through false information and IP, but this year, this method is very likely to be judged as cheating (itself is cheating - -) and then lead to the cancellation of the space. The reasons and details will be explained in the article. 1. Click to visit the DreamHost homepage and click the yellow Sign Up Now button.
2. Enter your email address and login password. This is used to log in to the control panel. Set the password strength higher.
3. When you buy DreamHost space, you will get a top-level domain name for free. If you want this free domain name, select the first option; if you want to bind your own domain name, select the second option. Then enter the domain name you want to register or bind in the input box.
4. Here you can choose whether to purchase for one year or two years. Choose as needed. The price for purchasing for one year before using the registration code is $119.4~
5. Pay attention to this page. Make sure to fill in the real information on your personal information. If it is CN, don’t write US. Except for the street name, which does not need to be too detailed, don’t make any mistakes in other information including the province and city!
6. Here you need to choose an FTP login name for your server. There are no special requirements, so just keep the default. The second item, your place of birth, naturally needs to be filled in truthfully. The third item asks where you knew about dreamhost, which you don't have to write. The last item is the discount code. Using OUT90 can save you $50, which is the most generous discount code currently available in China. Of course, you don't have to use it. ^^~ Although you can get a $90 discount if you register with a US IP using the same OUT90 discount code, this is a fraudulent act and DreamHost will cancel your hosting rights soon.
7. This is the credit card authentication interface. Enabling credit card authentication is the main change this year. Therefore, even if you use US information and register with a US IP, your nationality will still be exposed here. So, fill it out truthfully. Note that the OUT90 (50off) at the end means a $50 discount, so you can spend with confidence.
8. As shown in the picture below, it is actually completed. The account has been activated and the mailbox has received the activation confirmation email. However, when I was completing the tutorial at this point, the power went out. However, this seems to have made me discover something, which I will explain at the end of the article.
9. This page contains additional VPS promotion information. Generally, it is not needed. Just continue.
10. The same promotional information, choose according to your needs~
11. This page is to remind you to change the NS settings of your domain name. Because the establishment of the database is linked to your domain name, you must change your domain name NS to DreamHost's NS, otherwise you will not be able to build a website.
12. Now it is completely done. Enter your email address and password to log in to the control panel.
13. The picture below is the control panel developed by DreamHost. Click to enlarge it.
The purchase tutorial ends here. It should be pointed out that although Dreamhost's virtual host authenticates credit cards, the first 15 days are free. You can use it to your heart's content during these 15 days. If you are satisfied, don't worry about it. DreamHost will automatically deduct the relevant fees from your credit card. If you use the OUT90 discount code to purchase for one year, the remaining amount is US$69.4. If you feel unhappy during the past half month, you can close this account in the control panel Billing – Manage Account. After doing so, DreamHost will not deduct money when it expires. If you are still worried, you can delete your credit card information in Billing – Make Payment to put an end to it.
During the registration process, if you purchased a free domain name with your hosting, even if you close your account, the fee for your domain name—US$9.95—will be deducted.
Regarding the discount code, the same discount code of DreamHost has different discount prices when registering with a Chinese IP and a US IP. OUT90 discounts $50 when registering with a Chinese IP and $90 when registering with a US IP. Previously, we could use a proxy to enjoy the $90 discount, but after enabling credit card authentication, it is easy to determine your nationality and deactivate your account. Therefore, in order to safely use DreamHost's virtual host, in addition to respecting relevant laws, you must register with real information, including IP. DreamHost is not abnormal. I forgot which space provider it is, but they even have the IP address of our prefecture-level city! Moreover, Americans attach great importance to these (because Americans do not have such a thing as ID cards), so be careful not to try to save small profits and suffer big losses!
In addition, I registered two DreamHost spaces for this tutorial. Because there was a power outage in the eighth step, I thought the registration was not successful, so I registered again, one day apart. As a result, I found that both accounts can be used, which means that at the eighth step you can just close the browser or log in to the control panel directly without worrying about the rest. What's the problem here? I used the same credit card to purchase two DreamHost spaces, but was only charged the credit card verification fee once, which was $2 (DreamHost will randomly deduct $1 to $2 to verify your credit card, which should be refunded to your credit card account after a few days).
So I guess that when you purchase DreamHost's virtual space and reach the eighth step, you can ignore the subsequent steps to avoid this small certification fee. Although it is insignificant, it is always troublesome to deduct and refund it. The above is just speculation. Friends who are interested can verify it together. Just don't forget to change the NS of your domain name~ |