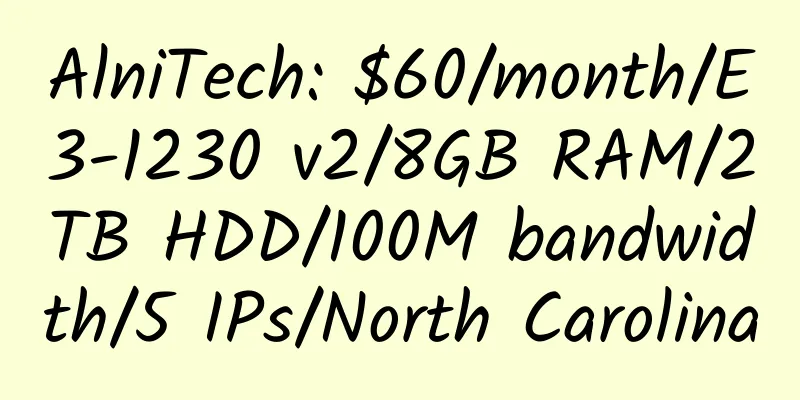
|
For the file management of Dreamhost virtual host, we usually use FTP client or Web FTP to operate. Although this operation is simple, it is a bit time-consuming.
For example, if I install the DedeCMS system on my Dreamhost host, the conventional method is to open the FTP client (such as FlashFXP, CuteFTP, FileZilla, LeapFTP and other FTP client management software), connect to the Dreamhost host to upload and delete files, etc.
Friends who are new to website building may unzip the DEDECMS file package locally and then upload it to the DH host space. However, the unzipped DEDECMS must have more than 2,000 files. Waiting for FTP to upload more than 2,000 files is a waste of time, and some problems may occur in the middle. Of course, some friends will say that I can directly upload the compressed package to the Dreamhost space, and then use the Web FTP of the Dreamhost Cpanel panel to decompress it online. Of course, this method is much more convenient and reliable than the previous one. It is also a common method for managing virtual host files. But what we are going to talk about today is not this method. What we are going to talk about is using the Linux terminal provided by the Dreamhost host for management, which is more convenient.
The terminal mentioned is similar to a command line window, which sends commands to the Linux system on the Dreamhost host to perform a series of operations such as file downloading, copying, editing, deleting, and moving.
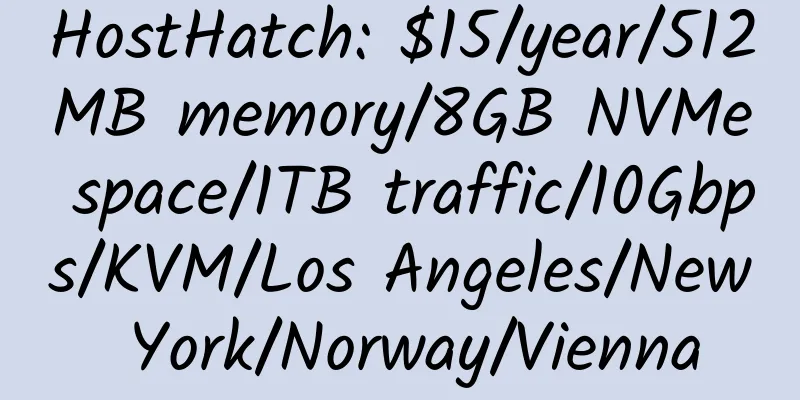
First you need the tool PuTTy (download address).
Open PuTTy and set the login parameters, which is the IP address of the Dreamhost host:
After entering the IP address, click the Open button, and PuTTy will open a similar window. It is a bit like the common CMD command line window, but sometimes there will be a prompt:
Normally, you don't need to pay attention to it. Click Yes and you will see the login window:
It should be noted here that there is no prompt when entering the password, unlike the common asterisks that are displayed. It doesn't prompt anything, just like nothing has been entered. In fact, it has already been entered. Don't worry about it, just enter your password directly, and finally press the Enter key. If your account is correct, you will see a prompt that the login is successful.
The following is a screenshot after successful login:
Okay, this is the end of this article. The next article will introduce detailed command operations.
I will explain the whole operation process with examples here.
I have opened N sites on my Dreamhost space, so there will be many folders named after the site domain name in my host directory. Let's use the Linux ls command to take a look. Type ls in the command line interface and press Enter.
It should be noted that Linux commands are case-sensitive, and commands are generally lowercase.
In the picture above, I made an example. I entered uppercase LS and Linux prompted command not found, which means the command was not found.
OK, the picture above lists the site directory on my host. Now I want to install DedeCMS on the diggfree.com site.
Okay, we need to enter this directory first. Just enter the command cd diggfree.com and press Enter. There is no prompt and we are already in this directory.
Now I want to see if there are other website programs or files on this site. Continue with the ls command to display the files.
To sum up: In this article, we mainly introduced the ls command and the cd command. These two commands are very simple. In the next article, we will continue to introduce how to remotely download files, decompress files, and other operations.
In the previous article, we introduced the ls command to display and view files and the cd command to switch directories. In this article, we will continue with the rm command to delete, the wget command to remotely download, the tar command to decompress, and the mv command to move files.
Last time we used the ls command to see that there were some files in the diggfree.com directory, and we wanted to delete them. Then we use the cd diggfree.com command to switch to the directory, and then use the rm * command to delete all files in the site directory.
After we use the rm * command, we use the ls command to check and find that the files in the directory have been cleared.
Okay, now we need to move the DedeCMS program to this directory. Now let's introduce the wget command, which allows the Linux server to directly download the file you specify, and it uses the bandwidth of the remote server, so the download speed is absolutely fast.
wget command format: wget+space+remote file path. There is a trick here. Did you see that the download path is so long? Do I have to enter it word by word? No, we just need to copy the download address and type wget+space, then right-click in the PuTTy window. You can see the advantage of the wget command. It uses a remote server to download directly from the dedecms website and then save it, which saves us the step of uploading it, and its downloading is not slow at all!
OK, after the wget command is completed, from the above picture we can see that the ls command shows that DedecmsV55-UTF8-Final.tar.gz has been saved in the directory.
Now that we have the compressed file, we need to decompress the installation file. We can directly use the tar xzvf DedecmsV55-UTF8-Final.tar.gz command to decompress it remotely.
The tar decompression command format is: tar+space+zxvf+file name, where zxvf is the decompression parameter. After decompression, the DedecmsV55-UTF8-Final you see through the ls name is the decompressed file directory. We also need to move the dedecms files from it to the diggfree.com site and directory.
Now you need to enter the uploads directory. The picture below shows that I mistakenly entered the directory DedeCmsV55-UTF8-Final as DedecmsV55-UTF8-Final for the first time. It is not case sensitive, so an error occurred when using the cd command.
The following figure is a screenshot after executing the mv move file command:
The format of the mv command: mv + space + source file path + target folder path. I executed mv ./* /home/dyzinfo9527/diggfree.com here.
The source file path is ./*, which means all files in the current directory. The directory file path is /home/dyzinfo9527/diggfree.com. Why is it this way? Because my website directories are all under the home file on the Dreamhost host.
dyzinfo9527 is my Dreamhost username, and diggfree.com is one of my subsite directories.
Well, we have moved the dedecms installation file directly to the root directory of the diggfree.com site, and we can install it by simply opening http://www.diggfree.com/install/.
If you are familiar with this method, then managing files on Dreamhost will be easy!
Well, the DreamHost practical technology tutorial on SSH management is complete! |